Wednesday, October 6, 2010

November Technique Class-November 3rd and 4th

Wednesday, November 3rd at 10:00 a.m. or Thursday, November 4th at 6:30 p.m.
We'll make four cards...

First is this treat cup snowglobe card which also uses the Smooch Pearlized Accent Ink.  We'll add silver Glass Glitter and faux snow to the inside.
 We'll use the Inlaid Embossing technique from Fort Worth Regionals in a Nordic Christmas design. This card is a CASE with changes of page 4 of the Stampin' Up! Holiday Mini Catalog.
 A little Embossing on Embossing of the snowflake embossing folder:
Finally a Criss Cross Card using the Welcome Christmas set with our great seam binding ribbons:

Tuesday, October 5, 2010

Christmas Stamp A Stack #2 Offerings...

The cards for Christmas Stamp A Stack #2 are ready for your consideration....16 cards for $22.

Voted Most Popular so far, the Pacific Point Trimmed Ornament (This card was inspired by Glenda Travelstead's card using A Cute Christmas at Fort Worth Regionals. I just added the inner cardstock trim and changed the stamps, border, ribbon and colors.):


Also, from Glenda Travelstead's Fort Worth Regionals presentation (though she made her own snowglobe base, and I used the stamp) is the Snowman Globe. I love using the snowflake to cover the "to:  from:" on this stamp with ease!:

Blue Snowflake Tinsel:

A Red and White Nordic Snowflake choice:

The last one is a real head-turner-sorry!! I couldn't resist saying that. Not sure what causes this...I tried 3 times to re-do, and then I was done. Usually as long as the picture is taller than it is wide, this doesn't happen?

This is a Kickstand card from several years ago..I thought it was time to try another one of those. The Rhinestone Bling is not included, but it is under $6 for enough to do all your cards. (They are $4.95 in the book--under $6 includes shipping and tax.)


Sunday, September 26, 2010

October Technique Class- October 7th....

Thursday, October 7th at 6:30 p.m. or 10:00 a.m.

First, we will stamp with real leaves on this fun buckle style card with the Texture Wheel rolled on the front flap....This card has several sentiment choices..

 Next we will use the Paisley Prints set for marker to stamp on the leaves and Scratch and Sniff on the pumpkin....You may choose to make this card for Thanksgiving or create a Thank You card with other sentiments as well...Please note: I do not have a "happy birthday" that will fill the space on this card.  You could use the True Friend stamp shown above though.


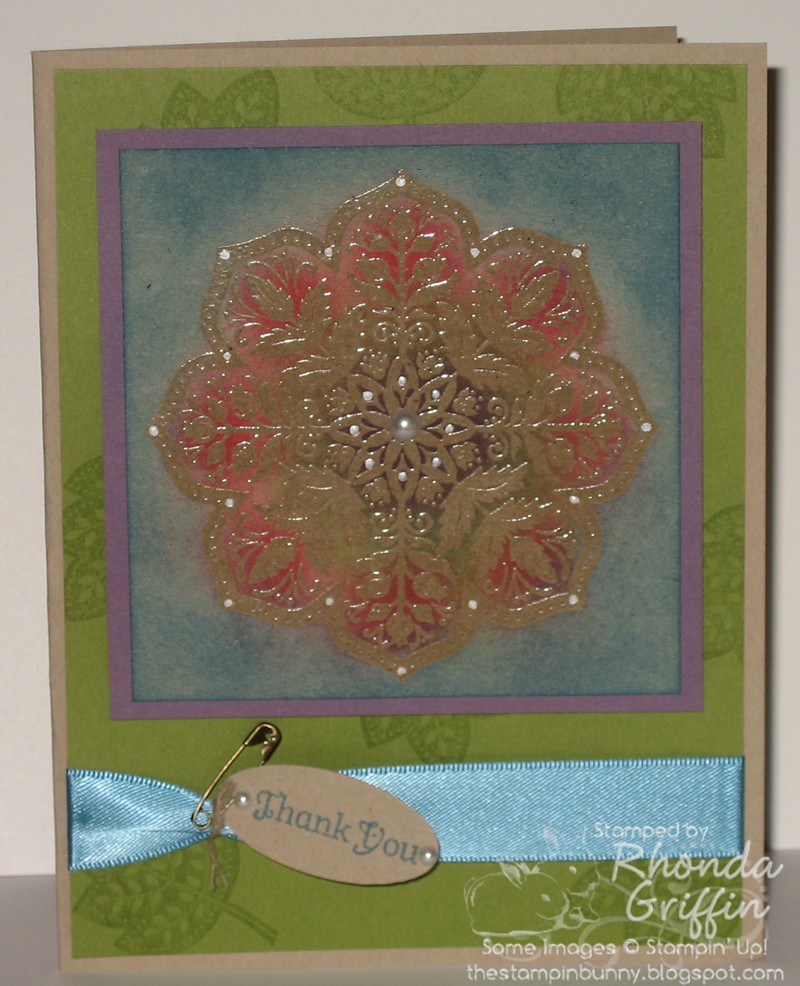
This card is a little rustic and a little fancy....It uses the Emboss Resist Technique on Kraft/Crumb Cake cardstock and is accented by Pearls, a vintage safety pin and dots of our Smooch Moonlight Accent Ink. Sorry the details are difficult to see. There is an easy "Happy Birthday" substitute for this card.


Finally, we will emboss with craft ink for this sparkly Christmas card....


I hope to see you all there!

Wednesday, August 18, 2010

September 16th Quick Chicks and Chocolate Class at 10:00 a.m. or 6:30 p.m.

We'll make four cards that I tried to "step up" so that any stamp club members who don't need a bunch of Halloween treats will feel they've seen a good amount of techniques at this class instead. (Stamp Club members may choose to come to this class for free instead, but I still need to receive your club orders by September 2nd.)

First, we have this Reverse Letterpress card which also contains a nice sampler of 4 of the Stampin' Up! ribbons. It was also Stampin' Addicts Sketch Challenge #61.

Next, is this Poppin' Pastels Because I Care card.  You may use a small sentiment from the Teeny Tiny Wishes set-it doesn't have to be Get Well only.  We'll use the StampAMaJig to easily place the sentiment of choice.

The sketch challenges on Stampin' Addicts have been perfect for me lately, so I used SASC63 for this card after turning it at a 90 degree angle.  I think this gender neutral birthday card is quick but cute.
Finally, one Halloween card just to give a nod in that direction with the great Wicked Fun designer series paper and Black Lace Ribbon.

Tuesday, August 17, 2010

Christmas Stamp A Stack #1 September 30th at 10:00 a.m or 6:30 p.m.

We'll make 16 cards for $22....You have a choice of the following cards, but I need you to tell me your choices as soon as possible for ordering.  I'm trying to use a variety of greens and reds and different color combinations--I hope it works out. :)

Many of these cards would be wonderful with Bling or Pearls.  You might want to consider adding a pack of Basic Rhinestones adhesive backed embellishments to your next order. They are $4.95 plus tax and shipping.

Snowy Dasher with the Northern Flurries Embossing folder---Bling would be adorable in the center of each snowflake...just sayin'.


The Musical wheel, Perfect Punches set and sentiments from Come to Bethlehem make a different style card.


This Cardinal has a rich and luscious color scheme...


This "Welcome Window" card's sketch is Stampin' Addicts Sketch Challenge #62, and the Welcome Christmas was easy to use for this card.


This Ornament card uses Stampin' Addicts Sketch Challenge #65 and the Tree Trimmings set:


How about another Welcome Christmas set card? This time it has a Z-fold and pretty Pear Pizzazz, Ridinghood Red and Baja Breeze color scheme.


For something simple and Faith oriented, here's a Cherry Cobbler and Artichoke Come to Bethlehem card using the sketch from MOJO154.


This card uses the new Paisley Prints set to give your card recipients the Christmas spirit:


Just in case you'd like to see an example of what you might do with your bling--click on the picture if you'd like a closer look:

Monday, August 16, 2010

September 1st (at 6:30 pm) & August 30th (at 10:00 am) Technique Class

This month's technique class is Halloween Happy!  The techniques certainly carry over to other occasions, so I hope you will find them very useful.

First, we have this dark and dreary Soot Stamping card:

I will "pre-soot" the background, but you will have the opportunity to "soot" the main image and of course stamp and spray seal both pieces.

Next, is this fun spider webbing card.  It is heat embossed after Big Shot embossing with White Craft Ink and Iridescent Ice Embossing Powder.  The main image uses the Pullin'  Pastels technique for a smokey, foggy look. Do you see the black widow?

Third we will make this candy box from the candy wrapper die. It is altered slightly to stand on its own, and my example contains white chocolate coated "witches' wands".  The ribbon is simply wound through the holes in the die. Easy Peasy!

Finally, this black craft embossed watercoloring card makes a sweet and spooky card for a child or friend or use it as a little decoration for your home.

Tuesday, August 10, 2010

August Quick Class Thursday, the 19th at 10:00 a.m. or 6:30 p.m.

Join me for quick cards on the first day of school! Four cards for $5...You can't beat that at the store!

The beauty of this card is the embossing folder and bling. It is incredibly fast to make and creates an elegant result.


This card features a quick technique for blending the inks on the flowers.
And a teen girl card...we haven't made many of those. I hope you can use one.


This card which utilizes the Clear Block as Stamp technique could have a variety of sentiments obviously...